|
This is an informational writeup for those of you who would like to enable the mechanical tilt option on your 1991-1995
Acura Legend moonroof. This will only allow it to mechanicly tilt.
Your moonroof switch will not stop the window at the closed position after this mod on it's own. True tilt moonroofs
have a 3 way switch that automatically senses the closed position, stopping the movement of the window. You would then
have to release and press the button again to move it up or down. Your car will not do this. You will need to
release the button when the roof is in the position you desire. This means it is somewhat of a challenge
initially, and a skill later to time your release point to close the window.
This is free information, and I am not liable if you screw up your car.
With that said, these are the tools that I used. From left to right, Flatbar, needle nose pliers, magnetic pickup
tool, angle head screwdriver ratchet, 10mm socket with extension.

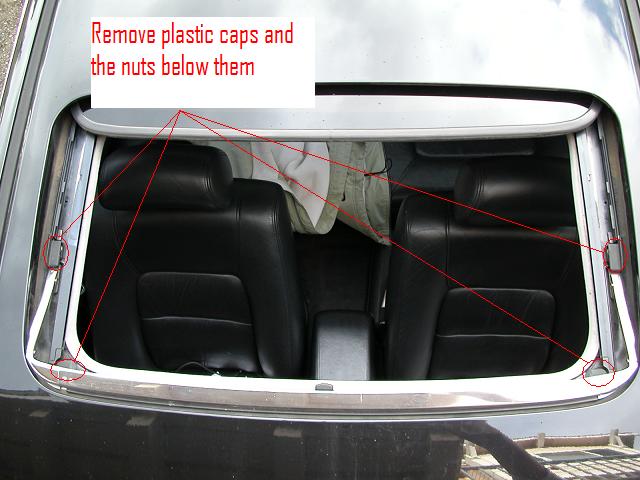
First thing, open the moonroof all the way. Next, locate the 4 mounting points as detailed in the picture below.
Pop the plastic caps off the rails, keep everything in order. Remove the nuts and bolts, and then lift the chrome wind
deflector from the car.
When removing the front stopper pieces, be careful not to lose them! This rubber piece falls out easily, but is
necessary for the roof unit to close quietly.

Locate the window stoppers on each rail. Now, lift the moonroof rails up enough to slip your needlenose pliers
underneath to grab ahold of the screw head. Remove the screws and stoppers. My pliers weren't strong enough to
loosen them, so that's why I broke out the angle head screwdriver. This tool is the key to doing this without removing
the glass. If you don't have it, get one from sears for around $4. Invaluable tool that has saved me many times
before. Be careful not to lose the screw underneath the rail system. That is why I had to get out the magnetic
pick up tool initially.
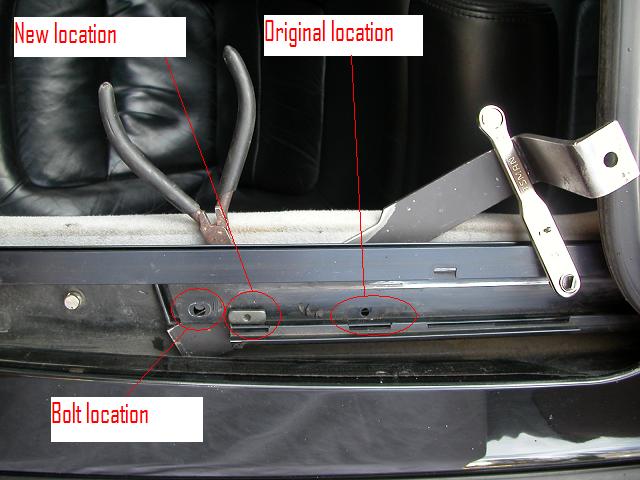
You could just ditch the stoppers and screws at this point and re-assemble, but I figured they put a forward stopper
location in for a reason, and I decided to use it. The hard part was getting the stupid screw in the front hole.
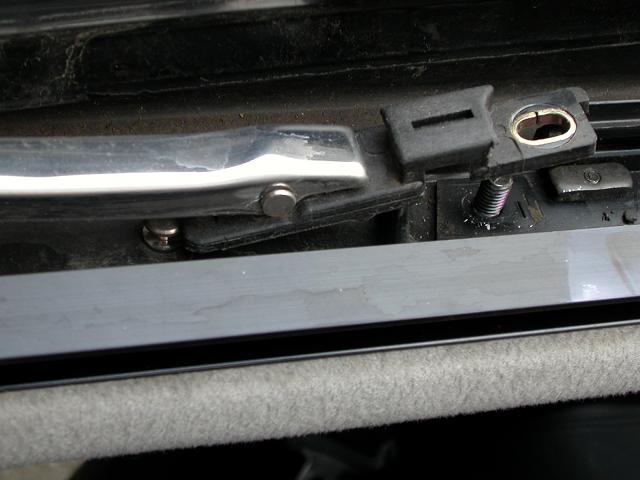
I was able to get it in with the pliers. Then I held it in place with the magnent from the top, and slid the flatbar
underneath. Now that the screw is held in place, put the stopper over it and slide the piers between the flatbar and
the bottom of the rail to slowly thread it down.
But, the pliers don't get it tight enough IMO, so I used the angle head screwdriver to tighten the screws after
the pliers got them snug.
After moving the stops on both sides, it's time to reassemble. When you put the chrome windspoiler back on, notice
that the mounting holes are elongated. This is important because some of the people who have done this complained of
the window "snapping" or "popping" when opening or closing. This is because the windspoiler is too close to the front
opening. Slide it back on these elongated holes, and test it by pushing it up and down to make sure it works properly.
|